Saturday, August 18, 2007

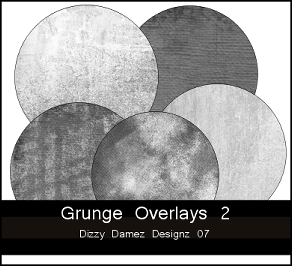
-Grunge Overlays 2


My newest freebie. My second set of grunge overlays. Each overlay is 12 by 12, 300 dpi, and in png format. I hope someone can use them.
If you'd like to download, just visit the link below.

Download Here

Huggles, 1 Dizzy Dame

Wednesday, August 15, 2007

-Stripe Pattern Overlays


My newest freebie. Set contains 8 different striped paper overlays. Feel free to use commercially if you want. No link back required, but as always, is appreciated.

If you would like to download the set, just visit the link below.

Download Here

Huggles, 1 Dizzy Dame

Tuesday, August 14, 2007

-Groovy Grunge Overlays


My newest freebie for you. These are my new groovy grunge paper overlays. Set includes 8 different textured/grungy paper overlays. Each overlay 12 by 12, 300 dpi, and in png format.
You may use my overlays commercially. No link back required, but appreciated.
Be sure to check out my new tutorial on how to create your own grunge paper overlays. I'm sure you'll find it easier than many of the other's that are out there.
If you'd like to download this freebie, just follow the link below.


Download Here

Huggles, 1 Dizzy Dame

-Creating Grunge Paper Overlays [my way]

:: Creating Grunge Paper Overlays [my way] ::

This tutorial written in Photoshop,
but can be done in PSP, as well.
Tutorial written for advanced users,
as there are no screen shots available.
After learning how to create paper pattern overlays,

I decided I was going to learn how to create
texured/grunged/scratched overlays.
I wasn't giving up until I figured out an easy way to do this.
I tried to follow different tutorials with brushes etc,
but they just didn't work for me.
It didn't matter how much I played with it, I just didn't like the outcome.
So, here we are, creating grunge the easy way.

The first thing you need to do, is find some free large textured images.
The bigger the better, because it's easier to size down in my opinion,
than it is to size up.

Let's Begin!

Begin by finding a nice textured image on the net.
[A free one or pay one, that is safe to use].
You can use an image that has a lot of texture,

scratches, grunge [the sky's the limit] here.
Once you find one you want, open it up in Photoshop.

Duplicate it, and close out the original.
We are going to resize it.
If your image is too big or too small, we'll fix this.
The image I'm using is larger, so I will be sizing down.
Go to image in your main tool bar, click on Image Size,

a box will pop up with all the image information.
In the area where it says: Document Size,

we will be changing some settings in there.
Change the width and height to 12 inches, 300 dpi.
Look down below that and make sure these settings are the same:
constrain proportions unchecked, resample image checked,
bicubic,and click okay. Now your image has been resized.
It may not look like much, but we have a few more things to do.

Next we need to greyscale our image. It needs to be in black and white.
Go to Image, adjustments, desaturate. PSP users, you can do this step

by simply going to Image and choosing greyscale.
Your image should now be black and white.
Next we are going to define our image to make the effect of our overlay better.
Go to Image, adjustments, but this time choose curves.
Play with the curves until you get a look you like, dark or light, and very defined.
PSP users, for this step you can create the same technique by going to Adjust, brightness/contrast, choose curves.
You're almost done!

Next create a new layer on top of your grunge image.
Flood fill this layer with a color of your choice.
Take your fill value down about 50 percent,
this depends on the lightness or darkness of the paper you are trying to achieve.
Play with your settings on that layer.
Change to hard light, overlay etc. just whichever effect
you think looks best.
Delete your colored layer, and save as a png.

And guess what?
You've created yourself your very own grunge overlay,
but we aren't done yet.
Make a folder in your documents where you wish
to save your own overlays.
And yes, it's now time to save!

Another great tip for this tutorial is to open
two different grunge images, and
do the same steps for both images,

drag one image onto the other.
Play with your fill values and overlay settings

to achieve tons of different looks!
Merge the two or more layers together, and save your new overlay.
Also, don't forget you can add your patterns,
to make a patterned grungy paper!
Isn't that cool, all the things you can do

when you're in the mood to create?!
I hope you've found this tutorial easy,

and more importantly, fun and helpful.
If you use my tutorial,

I would love to see what you create.
If you have any questions or comments,
post me here or in my shoutbox.


Huggles, 1 Dizzy Dame

©Dizzy Damez Designz, 2007.

Monday, August 13, 2007

-Digital Scrapbooking Sizing Tips

When I first started trying to create digital scrapbook items,
I was so confused about sizes. This is what I learned with all my questions.
I thought this might be helpful to you newbies.

Size for Papers: Papers should always be created 12 by 12, for digi scrap purposes, and should be 300 dpi for better printing quality. However, if you are making papers for taggers, you can vary the size and make them smaller, also they only have to be created at 72 dpi. Papers should be saved in jpg format.

Sizes for embellishments: Embellishments should typically be at least 1/2 inch, 300 ppi, and 300 dpi. Breaking this down in pixels it would be approximately 150 by 150 pixels. If you wanted a 2 inch embellishment, it would be 600 by 600 pixels, and 300 dpi. Keep in mind, that your embellishment size should match the size of your papers, so they look realistic enough to match in size. [In other words, if you are making a paper clip, you want it to look approximately the size it would look if you were actually making a scrapbook page]. Again, if you are making embellishments for taggers, you can make them bigger or smaller, and they only need to be saved in 72 dpi. Embellishments should always be saved in png format, this allows your embellishment to remain on a transparent background when needed.

Sizes for Overlays: Overlays for papers should be 12 by 12, 300 dpi, black/whites/grays, and saved in png format.

Ribbon Sizes: Ribbons should be 17 inches high by as wide as you want your ribbon to be. Some of the typical sizes of ribbons include, but are not limited to: 1/4-inch (.25), 3/8-inch (.375), 1/2-inch (.5) and 5/8-inch (.625).


Sizes for Scrapbooking Page Templates: Sizes are typically created in: 12×12, 10×8 and 8.5×11. Templates are typically saved as png, 300 dpi, and are usually layered.

I'll share more tips as I find them.

Huggles, 1 Dizzy Dame

-Going Dotty Paper Pattern Overlays


My newest freebie for you. As you can see, I've went all [dotty] creating pattern overlays. I've made tons. There are 7 dotty paper pattern overlays in this zip. Each pattern 12 by 12, 300 dpi, and in png format. And guess what? You can use these patterns commercially. I'm not asking for a link back, but if you use them it would be appreciated.

All patterns zipped together, and may take some time to download, so please be patient. If you'd like to download, please visit the link below.

Download Here

Huggles, 1 Dizzy Dame

:: My Wish ::


Money to Start my Own Graphics Business Online


Money to Start my Own Graphics Business Online

Voting starts in 0 minutes Robinhood Fund � The World's First Web 2.0 Wishing Well


Sunday, August 12, 2007

-Metallic Picture Edges


My newest freebie for you. As you can tell, I love creating metallic/metal items. The set contains 5 different sets of metallic picture edges for taggers. Each set on own layer. Each in PSP 7 & 9 format, and are 300 dpi. The set too small to use for scrapbooking.

The girl in the preview is my beautiful neice Shayla [aka Shay Bug]. This is her cheerleader pose from last year. Isn't she cutie, patootie?

If you'd like to download, just visit the link below.


Download Here

Huggles, 1 Dizzy Dame

-Creating Paper Pattern Overlays [my way]

:: Creating Your Own Paper Pattern Overlays ::

I tried and tried to make pattern overlays.
I thought, "how in the world do they do that?"
I knew how to create a simple pattern, but how do I get that pattern
to be seamless and fill a 12 by 12 paper correctly?
I played and played until I did it my way.
This was the easiest way I have found to do it.
I hope you find this tutorial easy, too.
This tutorial written in Photoshop CS2,

but can be done in PSP, as well.
This tutorial is for the advanced user,
as I have not included screen shots.

Let's Begin!
The first thing we'll be doing is making our own pattern to use.
Open a new 200 by 200 pixel, white, 300 dpi image in Photoshop or Paint Shop Pro,

doesn't matter which one you use, although I prefer Photoshop.
Next choose a brush or shape you would like to make your pattern with.
Make sure your background and foreground colors are set to black or a gray color.
This is so your pattern can be colored, later on.
Also, keep in mind you can reverse,
and instead use a black background with white or gray images, as well.
Create a new raster layer.

Draw your shape or brush as big as you wish it to appear overall.
I think smaller images make better patterns myself.
So sizing is strictly up to the effect you "wish" to create.
Once you get your image drawn, duplicate it.
Move your duplicated shape/brush straight across from it,
or you can stagger it a little, this is up to you, as well.
Images below show what I mean, in either case.


Once you have your duplicated shape/brush
where you want it to be, merge your image visible.
Next, crop out any access background.
Go to edit, Define pattern, give it a name, and yes, save it.

You've just created your pattern.

Now on to the fun part, that is,
checking out what it looks like on a 12 by 12 paper.
Open up a 12 by 12, 300 dpi, transparent image.

Go to edit, and choose fill from the list.
Choose your patterns menu.
Scroll down the list of patterns,the pattern you just created
will be the last one in your pattern menu.
Choose your pattern, and click okay.
Click on your zoom tool, and click on actual pixels.
This will show you how your pattern overlay, looks on a 12 by 12 paper.
If it doesn't look great or doesn't tile correctly, all is not lost,

just mess with your shape/brush image,
and move it around and save as a new pattern.
Once you get it to look how you want, you'll need to save it.
I've created a folder in My Documents for the pattern overlays I've created.
Save it where you want, and make sure you save it as a png file.

There are so many patterns and styles you can create.
Remember, you aren't just limited to using shapes and brushes,
you can use other images, as well.
The main thing is to get them to tile correctly.
Also, if you are making patterns to sell,

remember to use copyright free images,
and things you've created yourself as not to violate any TOU's.
I hope you enjoyed this tutorial.

If you try it, and found it helpful
would love to hear from you.
Just leave me a comment here in the post, or in my shoutbox.

Huggles, 1 Dizzy Dame

© Dizzy Damez Designz, 2007.

Saturday, August 11, 2007

-Color Your Own Circalicious Paper Pattern Overlays


My first set of patterned paper overlays. The set comes with 5 different patterns. Each pattern 12 by 12, 300 dpi, and in png format. This is my first set, so I hope someone can use them. I really enjoyed making them.

To download, please visit the link below...

Download Here

Huggles, 1 Dizzy Dame

-Color Your Own Paper Pack Overlays


My newest freebie for you. I'm slowly learning how to create papers, this isn't my strong suit. The set comes in 8 different fiber paper overlays. You can use to color your own, and create your own papers. Each paper 12 by 12, 300 dpi, and saved in jpg format. I hope I saved correctly.

You can also use these commercially if you want. I don't require a link back, but would love to see what you use these for, if you decide to download and use. You can download the paper overlay pack from the link below. Sure hope someone can use them, even though it's my first try creating papers :) Be patient all papers included in the same zip, and may take a few minutes to download.

Download Here

Huggles, 1 Dizzy Dame


Friday, August 10, 2007

-Support the Seagraves Family

I'm looking for anyone interested in putting together
a collaborative kit to help this family.
Also, I need someone who could host the kit on their store,
as I don't own a store as of yet.
The money made for the kit, would be donated to this needy family.
I'm sure they would appreciate your help.
To read about their story, please visit the link below...

www.myspace.com/supporttheseagravesfamily

If interested in helping with this, please email me at: creativewhisper@gmail.com

Huggles, 1 Dizzy Dame

-Round Chrome Embellishment Freebie


My newest freebie for you. I created these last night, and thought I would share. Again, these were created with taggers in mind. Each embellishment in one file on own layer. Each in PSP 7 & 9 Format, and are 300 dpi. Embellishments come in different bright colors. I hope someone can use them.

If you want to download them, please download from the link below....

Download Here


Huggles, 1 Dizzy Dame

Wednesday, August 8, 2007

-Designer Charm Set


My newest freebie for you. This is my designer charm set. I made this with a couple different uses in mind. You can use the charms seperately, add them to the ribbon clasp I made to go along with it, or add a charm link to make a designer charm with. Also, you can just use the ribbon clasp by itself. Each piece on own layer and in PSP 7 & 9 format. Could easily match my first freebie to you. Each charm is 300 dpi, and was made for regular taggers in mind. The charms themselves come in numerous rich colors for you to choose from.

If you would like to download this freebie, just follow the link below.

Download Here

Huggles, 1 Dizzy Dame


Tuesday, August 7, 2007

-Favorite Tutorial Links

Do you have some favorite tut links to share?
Please post them here.
We could all use some help sometimes, now can't we? :)

Huggles, 1 Dizzy Dame

-Simplistic Beauty Tag Offer


Here's my first tag offer.
Will make this tag for the first 10 requester's.
I love making tags, so request yours while it lasts.
Don't forget to tell me what name you would like on it.
Huggles, 1 Dizzy Dame

- First Freebie :) -


Here's my first freebie for you. I made these tonight, and I hope you can use them.
These are my Satiny Clasped Ribbonz.
Each ribbon embellishment on it's own layer and in one file.
I have included tons of different colorz, as well as,
a template unmerged so you can color your own.
Simply add your own color to each ribbon, merge visible,
and you have your own ribbon!
Each ribbon is 300 dpi, and saved in PSP 7 & 9 format.
They were made with general tag making in mind, but
might be usable for digital scrapbooking. You can download the zip
from the link below...

Download Here

If you download, please leave me a comment to
tell me what you think?

Huggles, 1 Dizzy Dame

Monday, August 6, 2007

:: Welcome To Dizzy Damez Designz ::

We would like to welcome you to Dizzy Damez Designz.

We are new to blogging, so bare with us, while we get our blog started.
We've been designing for over 6 years now,

and hope to bring you a wonderful design world filled with color.
Our motto is to design with you in mind.
Simply put, our designs are inspired by you.

You'll learn new things about us, as well as, to grab freebies we post on this blog.
We only ask a couple of favors. Grab what you want, and offer a thank you. Please do not post our graphics on your site, claim as your own, or share in any kind of group. Again, these are freebies posted for you to use and are our own creations. We don't require you to link to our site, but would appreciate it. Or just send some of your friends our way.


Most of our items are made in PSP for general tag making, however, we are learning how to create items for digital scrappers, as well. So, at times we will offer items for scrapbooking too.

As of now, we are working on opening our own graphics business online. As if you didn't know, the name of the business is [Dizzy Damez Designz], so while we are working on that, please browse our blog, and download a weekly freebie or two.

Please join us here for weekly freebies, and we ask:

Let us color your world!

If you have any questions or comments please send email to:
admin@dizzydamezdesignz.com

Huggles, 1 Dizzy Dame